In this article we will discuss how to connect your WooCommerce Shopping Cart to your ManageMore program, using the WooCommerce REST API. This method of communication allows you to easily synchronize your Web Inventory items, including quantities, with your ManageMore database. In addition, you can automatically retrieve your WooCommerce orders, directly into the ManageMore Sales Order processing system.
Step 1 – Enable WooCommerce REST API and Generate Keys
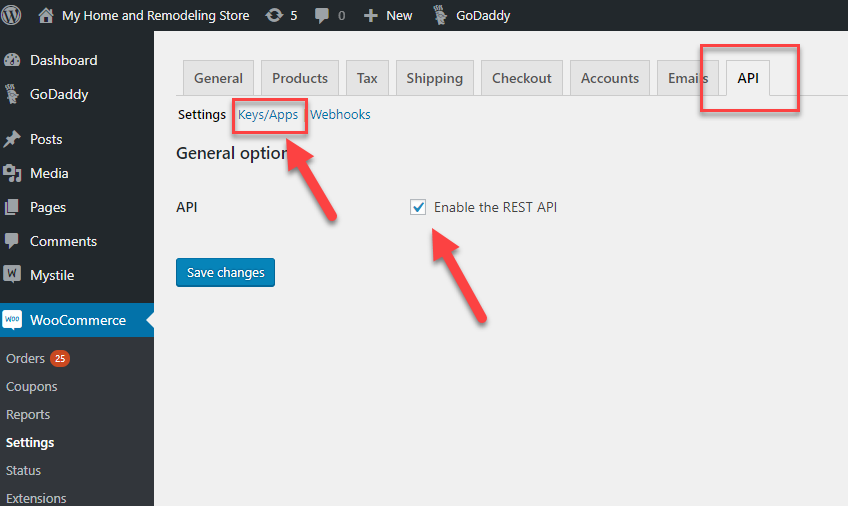
To enable the REST API in WooCommerce, login to your WooCommerce enabled WordPress Dashboard. Select WooCommerce … Settings. Then click on the Advanced Tab (formerly the API Tab). Click on the link for the REST API section within the Advanced Tab and then click on the Add Key Button.
You will be presented with the New API Key dialog. Give the Key an appropriate description name like “ManageMore” and be sure to select Read/Write in the “Permissions” field.
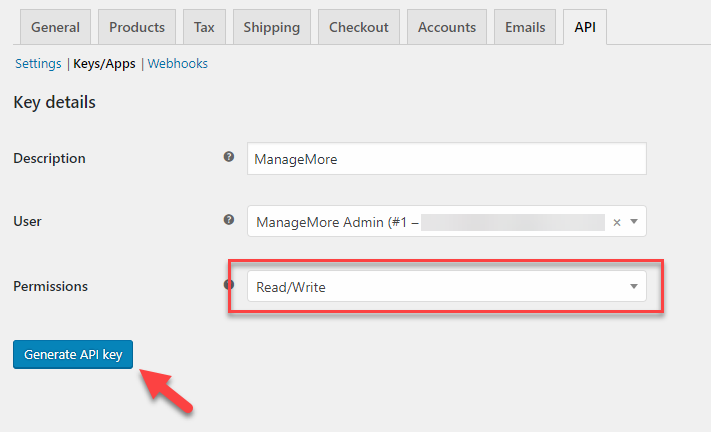
Once you click on the Generate API Key button, you will be shown the generated keys and have the opportunity to copy the values to paste into the ManageMore program.

Be sure to stay on this screen until you have pasted the values into ManageMore on the next step. You will not be able to copy the keys again once you leave this page.
Step 2 – Update your ManageMore eConnect Gateway Settings
In ManageMore, select Setup … eConnect Interface. Be sure to select the “API Method” on the Connection tab. Then select the API Settings Tab, and click on the “New” button to create a new ManageMore Web Service record.

Give your new Web Service an appropriate name for selection. Select WooCommerce as the API Type. Then provide the URL (do not include https://) for your website. Paste the values copied from the previous step into the Consumer Key and Consumer Secret fields. Then click on the Test Connection button to test your connection. If your settings are correct, you will receive a “Test Successful” message when the button is pressed. Note: For certain Web Hosting providers, you will have to select “Use Alternate Authentication Method”.
Step 3 – Setup your Web Service Options
Choose the “Link Options” tab on the Web Service Record. Here you will find the Location to which you will be linking your inventory and orders. You can also select defaults for imported transactions. The “Advanced” tab contains options for Inventory Sync, and automatic quantity syncing, using the ManageMore Service Cache program.
IMPORTANT! Be sure to check and enter your last order id in WooCommerce that you DO NOT want to download. If no last order id is present, ALL historical orders will be downloaded on the first attempt.
Step 4 – Install the ManageMore Connector Plug-in
Next, install and activate the ManageMore Connector and the ManageMore Wholesale Prices Plug-in on your site. See our separate tutorial for instructions on downloading and installing the WooCommerce Plug-In.
Step 5 – Setup your WooCommerce Checkout Option and Matching Payment Method
Next, be sure to setup your Merchant Settings in the WooCommece Checkout Options. If using the ManageMore Merchant Account settings, select the appropriate section and enter your merchant credentials. The internal ManageMore Merchant Account requires no additional Payment Method setup. If you are using an alternate checkout option, you will need ensure you have a matching Payment Method in ManageMore. The “Long Description” of the Payment Method MUST MATCH the “Title” of the selected checkout option.

Payment Method setup can be found in ManageMore under Lists … Banking … Payment Methods.

Congratulations! You are now ready to Sync your ManageMore Inventory and Order Processing with your WooCommerce website. See our tutorial for instructions on how to Setup and Sync your Web Inventory. To receive orders, you just need to go to your Manage Sales Orders screen, or select Activities … eCommerce … Check Web Sales to manually check.