In this article, we will discuss how to integrate your WordPress Website with the Appointment Scheduler in ManageMore Business Software. This will allow your customers to log into your website and request, set, and/or cancel their appointments. It will also allow a logged in employee to view their schedule, and complete appointments on your website.
NOTE: This feature is only available in ManageMore Complete Edition Licenses.
Step 1 – Install the ManageMore Services on your computer
For more information about this, please see the article: Installing ManageMore Services
Step 2 – Install the ManageMore Appointment plugin on your Website
You can download the latest ManageMore Appointment plugin here: managemore-appointment.zip
Log into your WordPress Administration section (wp-admin). Select Plugins, then Add New. Cick on the Upload Plugin button. Choose the Zip file you just downloaded. Then click on the Install Now button. You can also use this method to update your plugin to the latest version.

Step 3 – Configure the Plugin Settings
In your WordPress Administration panel, select Appointments, then Appointment Settings.

Check on the option to Link with ManageMore via eConnect. Enter the eConnect IP Address where your eConnect Server is running. Note: It is recommended to have a Static IP Address for this computer. Enter the eConnect Port on which the eConnect Server is listening. The default port is 443. Provide the eConnect Password and eConnect SSL/TLS options if you use these settings.
Finally, choose whether the Customer Created Appointment Requests will be saved as:
- Appointment – To save as an order and appointment
- Order Only (Appointment Request) – To save as an order only which will need to be scheduled
Optionally, edit the Main Settings to customize the schedule and messages to suit your needs.
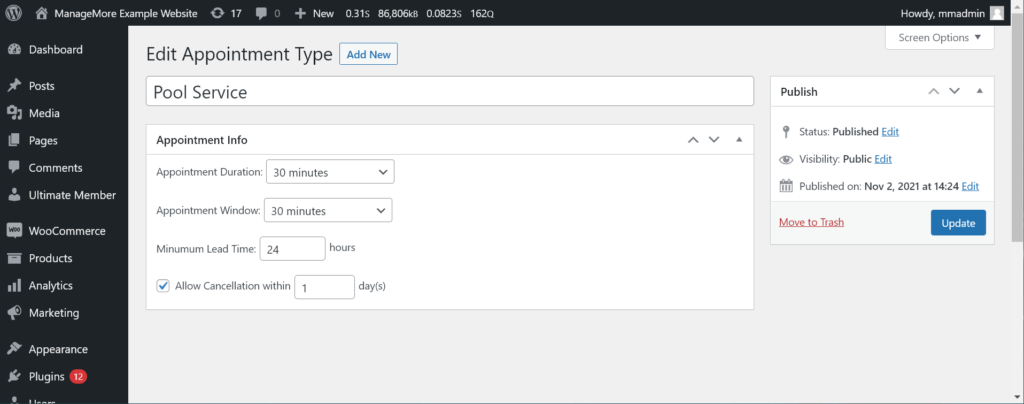
Step 4 – Create Appointment Types
Appointment Types are the different types of services that you are scheduling Appointmnents for. In the WordPress Administration Panel, select Appointments, then Appointment Types. Add the desired Appointment Types that you would like to manage on your website. The Appointment Types entered here should match your ManageMore Order Types, which have been set to allow Scheduling. See Lists … Order Entry … Order (Job) Types in your ManageMore Software.
You can also determine the behavior of the appointments for each Appointment Type.
Step 5 – Add/Edit Schedulable Users
You must have at least one user that is linked to a schedulable employee resource in ManageMore. In the WordPress administration panel, select Users, then add or edit the user that will be linked to a ManageMore employee.

In the Appointment Scheduling section, check on the option to Allow this user to be scheduled on Appointments. Then enter the exact Employee Id that matches a schedulable ManageMore Employee.
Step 6 – Add Pages with Appointment Shortcodes
[mm_appointment_request]
You will want of course want to have a page where Appointments can be requested by Customers. To accomplish this, all you need to do is add the mm_appouintment_request shortcode.
This shortcut will require the user to be logged in, and allow them to select an appointment type, see and select from available time slots, and confirm the appointment. This shortcode allows several optional parameters, which affect the behavior of the request.
- resource_id – Specify the Id of the user resource to be scheduled. If valid, only that resource’s open time slots will be shown
- employee_id – Specify the Employee Id of the user resource to be scheduled. If valid, only that resource’s open time slots will be shown
- appointment_type_id – Specify the post id of the Appointment Type to be scheduled. No Appointment Type selection will be shown
- appointment_type – Specify the title of the Appointment Type to be scheduled. No Appointment Type selection will be shown
- box – Set to 1 to display a box around the Appointment Request fields.
- show_resource – Set to 1 to display a selection drop list for the resource being scheduled. Default – No resource selection is shown.
- show_anyone – Set to 1 to allow a selection for Any Resource. Must have show_resource=1
- resource_desc – Override default resource description (e.g Technician, Stylist)
- anyone_desc – Override description for Anyone. Defaults to “Any ” + Resource Description
- button_desc_1 – Override description for “Check Schedule” button
- button_desc_2 – Override description for “Select Appointment” button
- button_desc_3 – Override description for “Confirm Appointment” button
- start_date – The default starting date for the schedule. Relative values are used. (e.g., “Today”, “Tomorrow”, “+1 Day”) Default = “Today”
- end_date – The default ending date for the schedule. Relative values are used. (e.g., “Today”, “Tomorrow”, “+1 Day”) Default = “+3 Days”
Example:
[mm_appointment_request appointment_type=”Haircut” show_resource=1 box=1]
This example will create a boxed area to request a Haircut Appointment. It will ask for the Resource.
[mm_appointment_list]
You will also want a page where Customers and Employees can see a list of their appointments. This is accomplished by adding the mm_appointment_list shorcode.
This shortcode will show pending appointments for the logged in Customer or Employee. If the logged in user is an Employee, they will be able to see a Map to the Customer Address, and also mark an appointment as completed. If the logged in user is a Customer they will be able to see the status of the appointment, and cancel the appointment if allowed by the Appointment Type.
This shortcode allows several optional parameters, which affect the behavior of the request.
- start_date – The default starting date for the appointment list. Relative values are used. (e.g., “Today”, “Tomorrow”, “+1 Day”) Default = “Today”
- end_date – The default ending date for the appointment list. Relative values are used. (e.g., “Today”, “Tomorrow”, “+1 Day”) Default = “Today” for Employees, “+[Maximum Lead Time] Days” for Customers
- show_resource – Set to 1 to show the resource on the Appointment List
- show_time_range – Set to 1 to show the end time of the Appointment in the list (start time is always shown)
- show_paging – Set to 1 to show page controls for long Appointment Lists
- hide_address – Set to 1 to hide the Customer adress on the Appointment List
Note: This page can also be called with a parameter of oid=ManageMore Order Number or aid=ManageMore Online Appointment Id, for example: http://www.mysite.com/appointment-list?oid=10012375 This will show the single appointment which is passed.