In this article we will discuss how to use the ManageMore Appointment Scheduling features. You can use the Appointment Scheduler to set, organize and notify appointments for customers. Appointments are usually linked to jobs or orders, so they can be automatically invoiced to the customer upon completion.
Appointment Scheduling is useful in the following industries:
- Accountants
- Alarm Installation
- Appliance Repair
- Carpet Cleaning
- Dental Services
- Drywall Services
- Electrical Contracting
- Fencing Services
- Flooring Services
- General Contracting
- Hair Salon
- Handyman Services
- HVAC Installation and Repair
- Irrigation Services
- Lawyer/Legal Services
- Janitorial Services
- Landscaping/Lawn Care
- Mechanical Services
- Medical Offices
- Mobile Pet Services
- Nail Salon
- Painting
- Pest Control
- Plumbing
- Pool & Spa Services
- Roofing
- Security & Home Automation
Note: In this article, the terms “Job” and “Order” are used interchangibly to refer to a Sales Order transaction. The title of the Sales Order transaction can be set in Setup … Application … Order Entry … General Options.
Step 1 – Enable Appointment Scheduling
To enable the Appointment Scheduling features in ManageMore, select Setup … Application … Optional Features. Then check on the option to “Show Appointment Scheduling” Other options such as “days available for scheduling” are chosen in the Appointment Scheduling section within Optional Features. Here, you can also specify whether all jobs orders must be scheduled. If not, you will have to specify which job types are scheduled. To do so, select Lists … Order Entry … Job Types.

Step 2 – Enable Employees for Scheduling
You must enable at least one employee for appointment scheduling. Appointments are always assigned to an employee record. (Note: An employee record does not have to represent an actual employee. You can use an employee record to represent a contractor, truck, team, the company, or whatever you want for purposes of creating the appointments)
To add or edit employees, select Lists … Human Resources … Employee List. Add or select the employee to enable. Choose the Scheduling tab. Ensure the option to “Allow Scheduling of Orders this Employee” is checked. If desired, you can override the days and times this employee is available for scheduling. You can also link the employee schedule to Google Calendar. For more information, see the article titled “Linking ManageMore Appointments to Google Calendar”

Step 2 – Add a Job Order and Schedule Appointment
Next, you can add a Job Order to be scheduled. Simply add the Order in ManageMore, by selecting Activities … Order Entry … New Job. Other ways that orders can be generated include Recurring Orders and Web Orders dowloaded from your website.
Once entered, the Job Order can easily be scheduled using the ManageMore Schedule Jobs screen. To get to this screen, select Activities … Order Entry … Schedule Jobs.
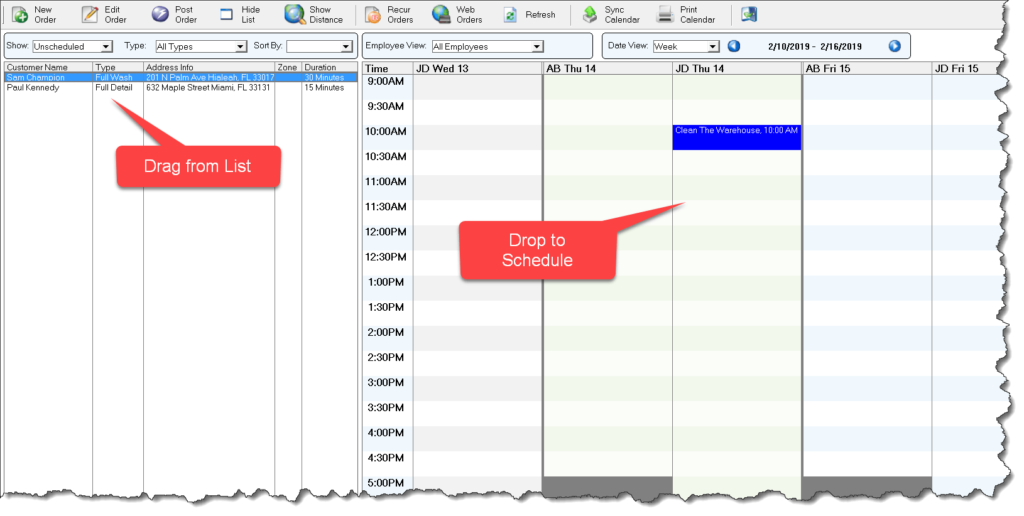
On the left, you will be presented with a list of unscheduled job orders. On the right, you will see the schedule for one or more employees. To schedule an Appointment for a Job Order, simply drag and drop the Order to the desired time slot. You can also drag the Appointment within the schedule to change the date, time, and or/employee.
Options above the list allow you to view different types of Orders and sort the Job List. Options above the Schedule allow you to view different employee(s) and date ranges in the schedule. In addition, the Schedule Jobs screen can be used to view the distance beteween selected Jobs and existing Appointments for easy geo-mapping of routes. You can also add a new Appointment by double-clicking the desired time slot on the schedule.
For more information about using this window, see the separate learning center article, “Using the Schedule Jobs Screen in ManageMore”

