In this lesson, we will explore how to implement and use the recurring billing features of ManageMore Business Software. The powerful and easy to use system lets you charge customers on a regular basis for flat rate and metered (usage-based) charges. You can charge customers automatically for any billing cycle, with support for daily, weekly, monthly, quarterly, and annual billing.
Step 1 – Activate the Recurring Billing Features
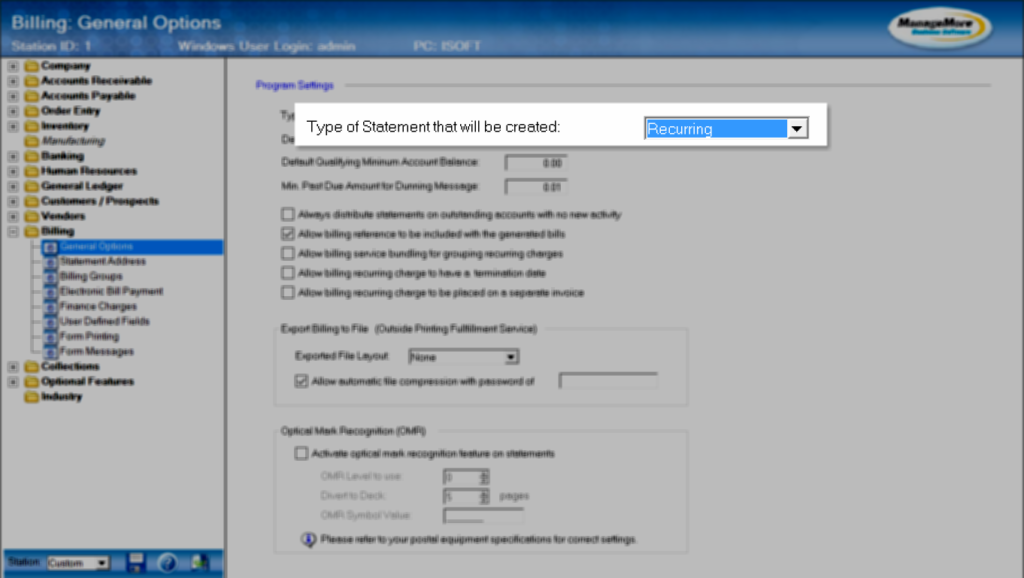
To begin, you must first activate the Recurring BIlling features of the program. Select Setup … Application from the main menu. Then, select Billing … General Options. Be sure to select “Recurring” for the Type of Statement that will be created.
Step 2 – Recurring Billing Defaults and Settings
After selecting the correct statement type, the billing general options screen will contain default values and settings to be used in the recurring billing process. First choose the method for Default Delivery of Bill.
- Printed Statement – A summarized statement will be printed, showing prior balance, payments received, new invoices and credits, new balance, and aging information.
- Printed Invoice – Individual invoices will be printed for each account.
- E-Mailed Statement – A summarized statement will be e-mailed to the customer.
- E-Mailed Invoice – Individual invoices will be e-mailed to the customer.
- Printed Recap Statement – A summarized statement will be printed showing current balance, last payment received, all invoices outstanding, and aging information.
If desired, choose a Default Qualifiying Minimum Account Balance. If a customer balance is less than this amount, they will not receive a statement. You can also set a Minimum Past Due Amount for Dunning Message. If set, customers whose past due amount is less than this value will not see automatic dunning messages on their statement.
Check on the option to “Always distribute statements on outstanding accounts with no new activity” if you would like to generate a statement for customers who do not have a transaction posted in the current period, but have an outstanding balance due. By default these customers are not sent a statement. Note: these customers do qualify for past due notices, sent using the Past Due Notice process.
Uncheck “Allow billing reference to be included with the generated bills” to hide the reference value on the statement, if desired. You can turn on the “Allow service bundling for grouping recurring charges.” This feature allows you to create service records, that contain multiple recurring charges which can be added, activated, and terminated as a unit. You can choose to “Allow recurring charges to have a termination date” if you wish to automatically discontinue charging certain recurring charges after a set period. By default, this is not allowed to prevent user errors. Check the option to “Allow billing recurring charges to be placed on a separate invoice” if you wish to use this feature.
Finally set the options for the Export Billing to File, and Optical Mark Recognition, if you are using these features.
If you would like payments to be mailed to a different address than your main address, select Billing … Statement Address from the setup application menu. This allows you to designate a PO Box or payment fulfillment center as the address to which payments are directed.
Step 3 – Setup Billing Groups
Billing Groups are used to determine which customers will be billed together, and to set billing cycles that are availble for the recurring charges assigned to those customers. In most cases you will need only one billing group, which was likely created during the new company process. To manage billing groups for your company, select Lists … Billing … Billing Groups from the main menu.
Click the Add New (insert) button to create a new billing group. You can also edit the billing group, as long as you have not yet run billing for that group. Once billing has run, it is not recommended to change billing settings, without consulting our support team.
The Billing Group identifier is simply a number that represents the group. We recommend a numerical sequence starting at one. The Description is an internal name for the group.
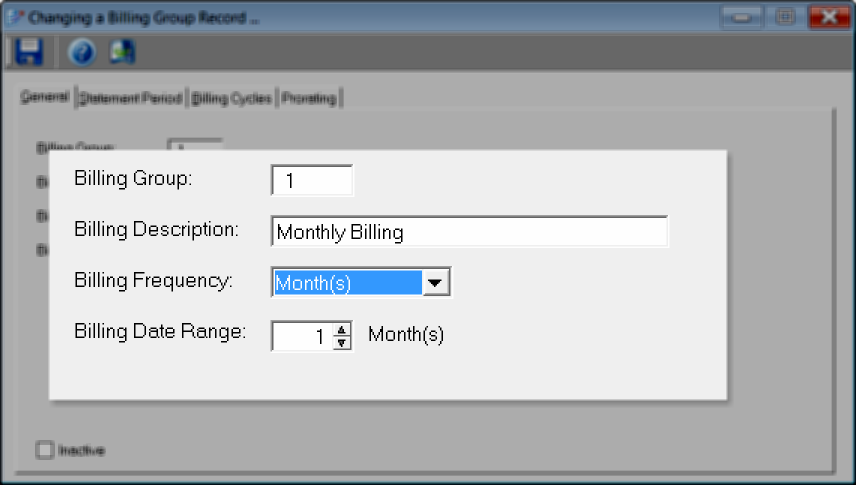
The Billing Frequency and Billing Date Range are very important, since together they determine the minimum cycle for billing, and how often the billing process is run. For monthly based billings (monthly, quarterly, semiannual, annual) you should choose “Month(s)” and “1 Month(s).” Other common settings are “Day(s)” and “28 Days” for 28-day based cycles (28 days, 56 days, 84 days), and “Week(s)” and “13 Week(s)” for 13-week based cycles (13 weeks, 26 weeks, 52 weeks)
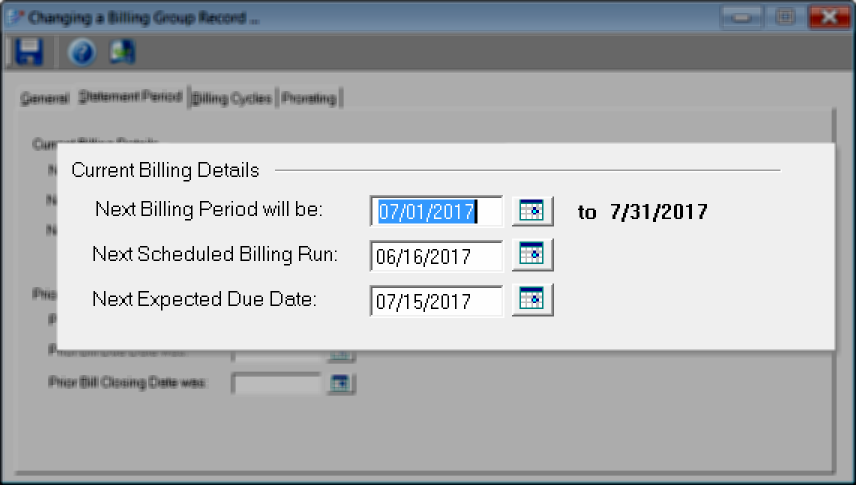
On the Statement Period tab, set the starting date for the Next Billing Period. The ending date will automatically be computed based on the settings previously entered. Note: This date should NOT BE CHANGED once a billing has been run. The Next Scheduled Billing Run is for information only, and indicates when the billing process should be run. The Next Expected Due Date will be used to calculate the due date for the next statements to be generated. This value may be overridden during the billing process.
Prior Billing dates are automatically maintained for information purposes.
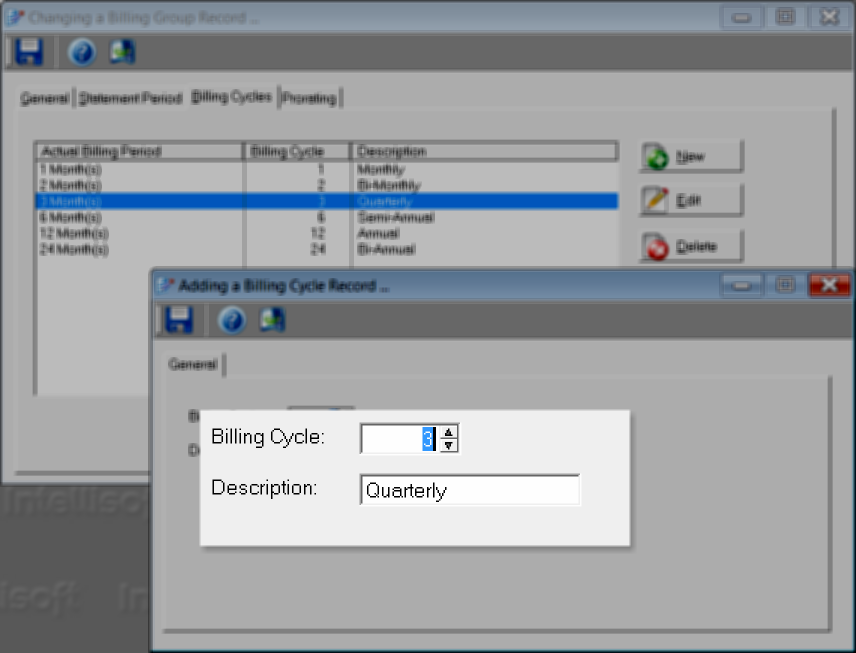
On the Billing Cycles tab, you will set the available cycles for this billing group. Click the New button to create a new cycle. Enter the Billing Cycle multiplier. This value is multiplied by the base Billing Frequency and Range for this group. For example, if the base Billing Frequency is “1 Month(s)” a value of 3 would represent three months or a Quarterly cycle. Likewise, if the base Billing Frequency is “13 Week(s)” a value of 2 would represent a 26-week cycle. Enter a Description for the cycle which will be used for selection on recurring charges.
Finally you can choose to have the program automatically calculate Prorate charges on the first bill.
Next Steps – Related Topics
Creating a Flat Rate Recurring Billing Charge
Creating Usage-Based Recurring Billing Charges
Using the Billing Wizard