Customer Care |
Previous Top Next |
Menu Navigation
Activities ... Customers ... Customer Care
About Customer Care
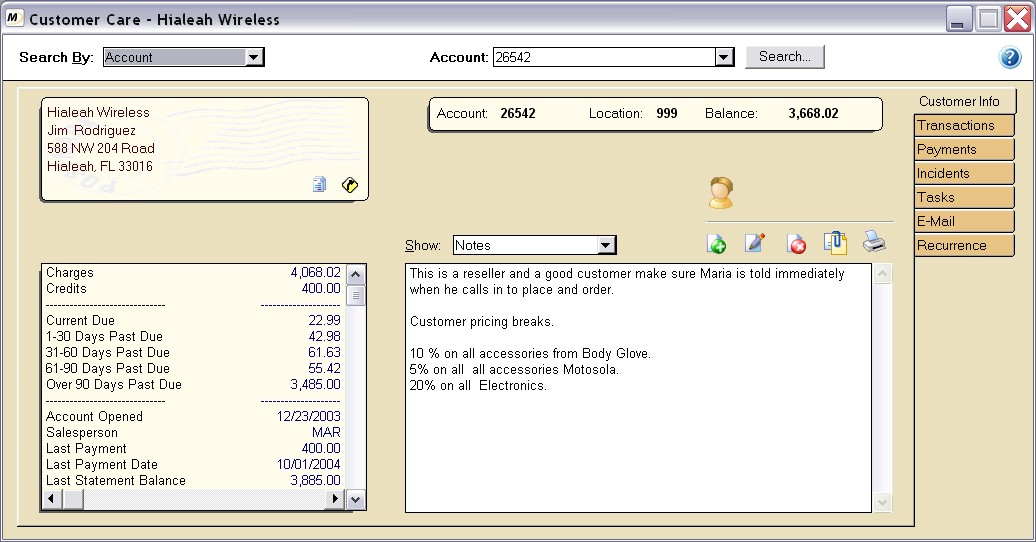
You will find the Customer Care screen to be an indispensable tool in serving your customers. From this one screen (see Figure 5-4), you can easily add a new customer or quickly find any existing customer or prospect. More than just a customer register, you have complete access to all records of the customer: services, transactions, payments, incidents, tasks, statements, and e-mail. This allows you to review and add data, quickly target statistics (e.g., balance, aging, last payment date) and answer the customer's needs promptly. This screen can also be used as a prospect manager, since prospect records are able to be viewed, edited and tracked here as well.
This feature requires activation in Setup Accounts Receivable. Please note that this feature may not be included in your software license.
In this Topic
Searching for a Customer/Prospect
Field by Field Help - Customer Care screen
Related Topics
3.15 Setup Toolbar
5.1 Customers
5.3 Prospects
5.5 Organizer
5.8 Web Tickets
5.12 E-Mail
| 1) | Select the Customer Care menu option. |
| 2) | Select method to Search By and enter a Search value. Press the <Enter> key. |
| 3) | Use tabs and buttons to add New, Edit, View and Print transactions and information for the selected customer. |
Searching for a Customer/Prospect
To search for a customer or prospect in Customer Care, you will first need to choose the method by which you want to search for the customer or prospect. Do this by selecting a method from the Search By drop list. The methods to use, the order, and behavior of these methods in the list can be determined using Setup ... Preferences ... Search Methods.
Once you have selected your search method, the box in the top center will reflect the search method change. You may then enter your search information. Once you have done so, click the lookup button [...] or press <Enter> on your keyboard. The program will then find the exact match or closest match to the entered information.
You may also click on the drop down list button at the end of the search field, to bring back information on any of the last 25 customers or prospects you have previously looked up.
Figure 5-4. Customer Care screen
Some additional keyboard search keys are included below:
| <Home> | causes the cursor to jump back to the search field while in Customer Care |
| <Alt+Home> | will revert Customer Care to the previously viewed record |
| <Alt+PgUp> | locates the previous customer/prospect in account order |
| <Alt+PgDn> | locates the next customer/prospect in account order |
| <Ctrl+PgUp> | locates the previous customer/prospect in name order |
| <Ctrl+PgDn> | locates the next customer/prospect in name order |
The Toolbar in ManageMore allows you to quickly access certain functions of the program. Each comes with its own associated icon. The user may select their preferences as to which toolbar items will be displayed by selecting the Setup...Preferences...Toolbar...User Toolbar menu option. The user can then choose the items to be on the toolbar and which to leave off. The toolbar will be specific to the person logging into the program, so that one user's toolbar will look different from another's.
Some toolbar items can behave differently when selected while Customer Care is open. Certain customer information will be passed on to processes like invoices, incidents, payments, and more. For example, if you have a particular customer's information on the Customer Care screen and want to make an invoice for that customer, you simply need to click on the New Invoice button on the toolbar that is found at the top of the screen, just above the Customer Care window.
The program will then create a new form for you with the information found on the customer's record that is in Customer Care at the time. Thus you only need to fill the pertinent information to finish the transaction, since the program has already done the other work for you.
Field by Field Help - Customer Care screen
Customer Address Display
This field will show the address as it is stored for this customer/prospect. You may also click on this address display to change the address information.
Send E-Mail
Click this button (found in the customer label) to send an e-mail to the customer/prospect. This button will display only for customers/prospects which have an e-mail address on file.
View Customer Statement
Click this button (found in the customer label) to view/print customer statement(s) which have been generated for this customer. When clicked, you will be presented with a list of statement dates applicable to the customer. Select the appropriate statement and click the print button to preview the selected statement.
Display Map
Click this button (found in the customer label) to display a map of the customer/prospect address.
Account/Prospect
Displays the account number/prospect number of the customer/prospect on screen.
Location
Displays the location number of the customer/prospect on screen.
Balance
When viewing a customer, shows the current amount owed to you by this customer. This field is not displayed for prospects.
Customer Info
This tab relates to customers only.
Service Type
Select between viewing notes, or industry-specific records, if applicable.
New
Click this button to create a new customer record.
Edit
Click this button to change the current customer's information.
Delete
Click this button to delete a customer record. Customers cannot be deleted if transactions or services have been created for the customer.
Attach documents to this customer
Click this button to attach files, scanned pages, or other documents to this customer's record.
Click this button to print a customer summary or customer history journal for this customer. A summary contains customer information and balance information. The customer history journal shows all invoices, refund, and payments this customer has made with your company.
Customer Statistics
In the lower left corner, you will find customer statistics. The statistics you wish to view can be changed through Setup...Preferences...Customer Stats.
Industry Service List
This list will show service detail information, depending upon the selection in the service type field above.
Transactions
This tab relates to customers only, and displays all Sales Quotes, Sales Orders, Invoices, RMAs, and Refunds for the selected customer.
Show
Select the type of transactions you wish to view from the list provided.
New
Click this button to begin a new invoice for the customer.
View
Click this button to view the currently highlighted transaction.
Refund
Click this button to create a refund or Customer RMA transaction depending upon the settings chosen in Setup Accounts Receivable.
Attach documents to this transaction
Click this button to attach files, scanned pages, or other documents to this transaction.
Click this button to print a copy of the transaction.
Payments
This tab relates to customers only, and displays all Payments received from the customer.
Show
Select the disposition of the payments to show in the list below.
New
Click this button to create a new payment for this customer.
View
Click this button to view the highlighted payment.
Reverse
Click this button to reverse the highlighted payment.
Attach documents to this payment
Click this button to attach files, scanned pages, or other documents to this customer payment's record.
Click this button to print a copy of this payment.
Incidents
This tab relates to customers and prospects, and displays all incidents made for this individual.
New
Click this button to create a new incident record for this customer or prospect.
Edit
Click this button to edit the Action Taken on the highlighted incident.
Delete
Click this button to delete the highlighted incident.
Attach documents to this incident
Click this button to attach files, scanned pages, or other documents to this customer incident's record.
Click this button to print the highlighted incident. The incident information will appear in the middle of a customer summary printout.
Tasks
This tab relates to customers and prospects, and displays all tasks related to the individual chosen.
New
Click this button to create a new task that involves this customer or prospect.
Edit
Click this button to edit the highlighted task.
Delete
Click this button to delete the highlighted task.
Click this button to print out a copy of the highlighted task or to print out a report of all tasks on this account.
This tab relates to customers and prospects, and displays all E-Mail sent to or received from this individual.
| The records contained here are copies of the sent/received e-mails from this customer by individual users and groups. Attachments are not copied to this section, and must be accessed via the original mailbox. |
Show
Select the disposition of e-mail messages to view from the list provided.
New
Click this button to send a new e-mail message to the customer or prospect.
View
Click this button to view a copy of the highlighted e-mail message.
Delete
Click this button to delete the copy highlighted e-mail message.
Click this button to print a copy of the highlighted e-mail message.
Recurrence
This tab shows the recurring charge items on this customer's account.
Show
Select the disposition of e-mail messages to view from the list provided.
New
Click this button to create a new recurring charge item.
View
Click this button to view the selected recurring charge item.
Delete
Click this button to delete the selected recurring charge item.
Collections
This tab will present a history record for each past due notice that has been sent to a customer. Pertinent information will be shown on this record, including the notice date, notice number, the msg ID (template ID), how the message was distributed to the customer, the past due amount & customer balance at the time of the notice, and aging information at the time notices were created. This information fills in from posting records in the Past Due Notices process.
Web Tickets
If you have the optional eConnect CRM module, this tab will show all web tickets that belong to the account displayed.
Show
Select the disposition of tickets to view from the list provided.
New
Click this button to create a new web ticket to the customer.
View
Click this button to view the selected web ticket.
Delete
Click this button to delete the selected web ticket.
Click this button to send a copy of this web ticket via e-mail to a chosen recipient. The customer will be the default recipient.
Click this button to print a copy of the selected web ticket.
| Q01. | Certain search methods do not display a list when a match is not found. How can I change this behavior? |
| A01. | Select the Setup ... Preferences ... Search Methods menu option. Here you can change the availability, order, and behavior of search methods in Customer Care. |
| Q02. | Can I change which statistics are shown for each customer on the front tab of Customer Care? |
| A02. | Select the Setup ... Preferences ... Statistics menu option. Here you can change which statistics will be viewed. |
| Q03. | I have a customer with too many service records to list in the service list box. How can I be sure that the record I need is listed? |
| A03. | If you search for the customer using a service record attribute (e.g. service phone number as opposed to account number), the service record found will be the first one listed. Also, you may select the "More ..." item at the bottom of the list to view all service records for the customer. |
| Q04. | Can I create a cash drawer payout to a customer from Customer Care? |
| A04. | You can do this by finding the customer in customer care, clicking on the payments tab, then creating a new payment. Then enter the amount of cash as a negative number. |
| Q05. | Can I make the Customer Care screen open automatically when I log in to the program? |
| A05. | You can have Customer Care come up automatically by opening the appropriate employee record, selecting the Options tab, and setting the Window to open at login to Customer Care. |
| Q06. | I don't see my question here. Where else can I get information? |
| A06. | Visit our website's Technical Support section. |
|
|
|
| © 2015 - Intellisoft Solutions, Inc. All rights reserved. | |
| Other Related Links | |
| Business Software | Cellular Software | Pager Software | Business Management Software |