| If you decide to enter the e-mail addresses by hand, you may enter more than one per line, as long as you separate them by commas or semicolons. |
|
|
Previous Top Next |
Menu Navigation
Activities ... Send E-Mail
Activities ... Use Organizer
About the E-Mail screen
The ManageMore E-Mail screen is used to create, edit and display internal and external e-mail messages. This one screen allows the user to easily add recipients, from ManageMore's database of Customers, Prospects, Vendors, Employees, and even personal contacts for each user. You can easily add file attachments to your message to send documents, spreadsheets, or reports.
This feature requires activation in Setup Company. Please note that this feature may not be included in your software license.
In this Topic
Related Topics
3.23 E-Mail Setup
4.5 Email Manager
5.5 Organizer
5.13 Bulk E-Mail
5.14 E-Mail Templates and Categories
5.15 E-Mail Removal
15.1 Employees
Setup
| 1) | Select the Setup Company menu option, and select the E-Mail Accounts category. |
| 2) | If desired, select the option to Send/Receive external e-mail. |
| 3) | Add e-mail accounts to define connections to external mail servers. |
| 4) | Review employee mail options for desired behavior for specific employees. |
Sending
| 1) | Select the Send E-Mail menu option, or New E-Mail button in Customer Care, Organizer, or other areas of the program. |
| 2) | Type a recipient name, id, or e-mail address, or click the To: button to view the Add Recipients screen. |
| 3) | Add recipients to the message (Customers, Prospects, Vendors, Employees, Departments, or Personal Contacts) from the address book, by highlighting the recipient and clicking the To:, CC:, or BCC: buttons. Click the OK button to save recipients selected. |
| 4) | Enter a subject for the message, and type the message to be sent. |
| 5) | Optionally, select an E-Mail Template to send a predefined message that can contain personalized information for the selected (customer) recipient's record. |
| 6) | Optionally, click on the Attachments button to add files to send with the message. |
| 7) | Click the Send button to send the message |
Receiving
| 1) | Select the Use Organizer menu option. |
| 2) | Click the Send/Receive button to receive e-mail. |
| 3) | Click on the Inbox folder and then double-click on the message to view. |
Field by Field Help - E-Mail screen
From:
Select the from name and address to be used to send the message.
To:
Click this button to choose e-mail recipient(s) to send this message to. If e-mailing to a customer, you may also select an alternate address by choosing the drop list selection.
CC:
Click this button to choose recipient(s) that this message will be copied to, and who will be named as recipients.
BCC:
Click this button to choose recipient(s) that this message will be copied to, and who will not be named as recipients.
| If you decide to enter the e-mail addresses by hand, you may enter more than one per line, as long as you separate them by commas or semicolons. |
| You may also manually fill in the company name, customer/prospect name or account number of the recipient into any of the three previous fields. The program will then search for an e-mail address in your database. |
Subject
Enter the topic of the e-mail message here.
Send
Click this button to save the e-mail and send it out. You must have at least one recipient before sending.
Save this message for later sending
Click this button to save a copy of this e-mail to your Drafts folder. This e-mail will be stored here until sent or deleted.
Add personal signature to this message
Click this button to add your signature (message at the bottom of the e-mail message) to this outgoing e-mail.
Add the company footer to this message
Click this button to add the company signature to this outgoing e-mail.
Check Spelling
Click this button to spell check your message.
Select e-mail template to send
Click this button to choose a predefined template to send to your e-mail recipient(s).
| E-Mail Templates are a great way to create quick, professional e-mail messages. You can predefine a message to send, and include personalized information for the recipient. |
Add attachment(s) to this message
Click this button to bring up the Add Attachments window, where you can add files to be sent along with this e-mail message.
In the box below this last set of buttons, type the text portion of your message, if any.
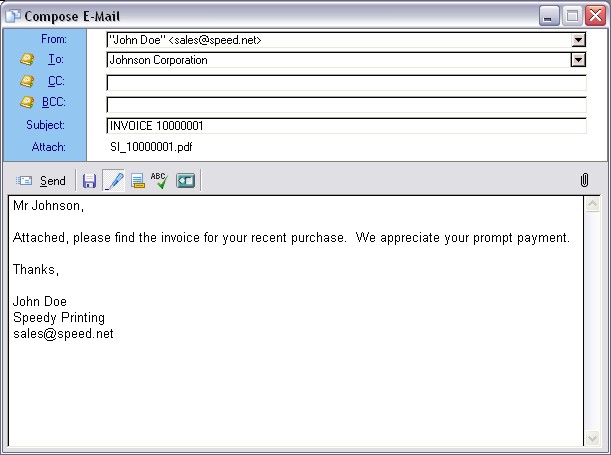
Figure 5-11. E-Mail screen
When adding recipient to this e-mail message, it is important not only to include who should see this message, but also who should see who is getting this message. As with other e-mail packages, ManageMore's e-mail capabilities allows you to send message to people in three manners:
| To | This is who you are sending the message to, the people who are going to be most highly affected by the message. |
| CC | If you want to copy someone on an e-mail, enter in their e-mail address in the CC (carbon copy) field. The CC e-mail addresses will be visible to anyone who reads the e-mail. |
| BCC | If you want to keep CC addresses private, enter e-mail addresses in the BCC (blind carbon copy) field. E-mail recipients will not be able to see who you copied this message to. |
Clicking on any of the three buttons labeled above will bring up the Add Recipients screen.
| If you want to keep all of your recipient's names and e-mail addresses private from each other, you can use only the BCC field if you wish. The e-mail will be sent "To: Undisclosed Recipients." |
Field by Field Help - Add Recipients screen
Show names from
Select the source of where to obtain a list of potential recipients from. Choose from Customers/Prospects, Employees, Departments or Personal.
Type a name or select from list
If the list of potential e-mail recipients is long, you can type a name in this box and press the Tab key to choose or get close to the person you wish to send e-mail to. Otherwise select a name below by clicking once on the person shown.
To
Once an e-mail recipient has been chosen on the left side, click on the To button to put their e-mail address on the right in the To portion of the e-mail.
CC
Once an e-mail recipient has been chosen on the left side, click on the CC button to put their e-mail address on the right in the Carbon Copy portion of the e-mail.
BCC
Once an e-mail recipient has been chosen on the left side, click on the BCC button to put their e-mail address on the right in the Blind Carbon Copy portion of the e-mail.
Remove
Once an e-mail recipient has been chosen on the right side, click on a Remove button to remove this e-mail address from the e-mail message.
Use company name
When checked, will use the company name as the e-mail recipient name instead of the individual's name.
Use alternate e-mail address
When checked, will use an alternate e-mail address for this recipient instead of the default e-mail address.
Use external e-mail address
When checked, will use an external e-mail address for this recipient instead of an internal e-mail address.
OK
Click this button to save the e-mail recipient information and go back to the e-mail message.
Cancel
Click this button to discard the e-mail recipient information and go back to the e-mail message.
When you want to send a file along with your message, just click on the attachments button on the main e-mail screen. The attachments button allows you to add files to or remove file from this message. You can attach as many files as you want to your e-mail message, provided of course that the total file size stays below the amount your ISP allows you to send out. For more information on how much your ISP allows, contact your ISP directly.
Field by Field Help - E-Mail Attachment screen
Attaching Files
The following options will be available when creating new messages.
Attach
Click this button to attach a new file to this e-mail message. Doing so will open up an Explorer-type window which will allow you to search for and find a file to add.
Remove
Click this button to remove the highlighted file in the Attach File window.
Close
Click this button to close the attach files window and save the files that have been added.
Viewing Attachments
The following options will be available when viewing received messages.
Open
Click this button to open the requested file, with the associated program.
Save
Click this button to save the attachment on your computer.
Virus Scan
Click this button to execute a virus scan on the highlighted file. This button will only be present if a virus scan command line has been entered in the E-Mail Management category of Setup Optional Features.
Close
Click this button to close the window.
| Q01. | Is there a limit to the size of attachment that the program allows? |
| A01. | No. However, most Internet Service Providers place a limit on the size of e-mails sent and received for external e-mail. |
| Q02. | I am viewing e-mail from the Customer Care screen. Why can't I view the attachments? |
| A02. | Attachments are stored for the original intended recipient only. That recipient may save the attachment in a shared folder, or forward the message to other employees. This feature eliminates duplicates of the same file. |
| Q03. | Is there a limit to the number of attachments per e-mail that you can include? |
| A03. | The only limit on attachments is the one your ISP places on the size of your outgoing e-mail attachments. Otherwise the program will not limit the attachments you include in an e-mail message. |
| Q04. | Can I e-mail transactions to multiple recipients from the same e-mail? |
| A04. | Yes. When you click the e-mail button on a transaction form, the original recipient will show in the To field on the e-mail message that is generated. You can then add additional recipients here. |
| Q05. | Can I e-mail multiple transactions to a customer on the same e-mail? |
| A05. | No. The e-mail function on a transaction in meant to e-mail one transaction at a time. |
| Q06. | When I try to send an e-mail message to someone, I get the error: "No valid recipients specified." What does this mean? |
| A06. | This error is coming back directly from your e-mail provider's outgoing mail server. It means that the email address provided to the server was found not be valid by the outgoing server. Your best option is to double check the recipient's e-mail address to make sure it is valid. If you are sure the e-mail address is right, contact your e-mail provider. |
| Q07. | I don't see my question here. Where else can I get information? |
| A07. | Visit our website's Technical Support section. |
|
|
|
| © 2015 - Intellisoft Solutions, Inc. All rights reserved. | |
| Other Related Links | |
| Business Software | Cellular Software | Pager Software | Business Management Software |