Lists & Labels |
Previous Top Next |
Menu Navigation
Reports ... Lists & Labels ...
About Lists & Labels
The Lists & Labels Manager allows you to create labels directly from the information you have entered into ManageMore. With this tool, you can create any number of different label formats, fine tuning the margins, individual text items, graphics and other features of the label. It also allows you to do mail merges, being able to print your own letters to send to customers, vendors, or prospects with respect to advertising, or informative services.
In this Topic
Field by Field Help - Lists & Labels screen
Related Topics
5.3 Prospects
5.1 Customers
10.1 Vendors
11.1 Supertrack Inventory
15.1 Employees
18.13 Creating Barcodes
| 1) | Select the type of labels you want to create from the Reports ... Lists and Labels menu. |
| 2) | Click on the IntelliQuery icon to select the particular record for which you wish to print labels. |
| 3) | Select the individual records from the list that you want to print. |
| 4) | Click the print icon to select the type of label to print out. |
| 5) | Select the label type then click the print icon to select the order in which the labels should print. |
| 6) | Optionally preview the labels, then print the labels. |
| 7) | Select another method of printing the labels, or empty the list and close the window. |
Field by Field Help - Lists & Labels screen
Print Lists & Labels
Click this button to print out the marked records.
Build List
Click this button to build a list by selecting a query. You can select a previously saved query or create e new one for use here.
Mark / Unmark List
Click this button to mark or unmark particular records on the list based upon selected criteria. The criteria for this window is explained in detail below.
Empty List
Click this button to empty the entire list of records.
Update Qty to Print
Found only on the inventory labels, click this button to change the number of labels to print on the marked items by adjust them all up by a certain number, down by a certain number, or to a specific number of labels per marked item.
Printer Default
Click this button to select the default printer for labels on this machine.
Mark / Unmark List
Action
Select whether the items that will be selected should be marked or unmarked when the criteria have been selected.
Action taken will be applied to
Select the method by which records will be selected. Choose from:
| All Items | Choose this option to select all of the records for marking or unmarking. |
| Items that were derived from | Choose this option to select records based upon how they were selected. Choose from Query Selection or Other Source (anywhere except Query Selection). |
Date range when items were initially
| added to list | Choose this option to select records based upon the creation date as shown on the list. You can choose via date range, or enter your own start and end dates. |
Items with a print order less than or
| equal to | Choose this option if you need to reprint labels from a certain point. Print order numbers are assigned after a printing of the list has occurred. This is mainly used to reprint labels should a printer jam or some other printing error occur. |
Select Report Template
This window appears after clicking on the print icon on the Lists and Labels window, or when choosing the Other option under the Lists & Labels menu option.
Select Report
Click this button to select the type of report (kind of label) to print out.
New Report Template
Click this button to create a new report template that can be used to print labels in the Report Formatter.
Edit Report Template
Click this button to modify the selected report template using the report formatter.
Delete Report Template
Click this button to delete the selected report template.
Copy Report Template
Click this button to make a copy of the selected report template and put it in the list with the name of "Copy of [Report Template Name]."
The report formatter allows you to lay out the exact manner in which list and label information prints. A label report format will generally consist of one band with several frames existing in the band.
If you are creating a new label format, you will be required to give the formatting a name. Additionally, you may want to change the margins to reflect the printable area of the label sheet that you are using. You may also access this by right clicking a blank area of an existing report and clicking on Report Properties, or by clicking on File, then Report Properties when a report is on-screen.
Report Formatter - File Menu
Report Properties
Choose this menu option to view or change the report properties.
Font
Choose this menu option to view or change the default font used throughout the report layout.
Choose this option to print the raw view of the report layout.
Exit
Choose this option to exit the report formatter without saving changes.
Report Formatter - Band Menu
New
Choose this option to create a new band. You will then be given a choice of bands:
| Page Header | Band of information that will appear at the top of each page |
| Report Header | Band of information that will appear at the beginning of the report. |
| Sorting Band | A band of information that will sort a detail band by a particular field within the detail band (for example, if you have a list of customers, you can sort by zip code and the sorting band would begin each new zip code with Zip Code: XXXXX). |
| Detail | Band of information that shows details of a label or report, of which the information usually repeated over and over through a page will comprise the details of a report. |
| Report Footer | Band of information that will appear at the end of a report. |
| Page Footer | Band of information that will appear at the end of each page |
| Page Form | Band of graphics and information that will overlay the page at the time of printing. Most useful for printing invoices, bills, etc. |
Properties
Choose this option to view the selected band's properties. This option is only available when a band is selected.
Report Formatter - Frame Menu
Create
Choose this option to create a new frame within the selected band.
Properties
Choose this option to view properties from the selected frame.
Delete
Choose this option to delete the selected frame.
Report Formatter - Options Menu
Items in this menu will have a checkmark in front of them if they are enabled, no checkmark if they are disabled.
Property Box
Choose this option to bring up a scaled-down properties box of the currently selected band or frame. This box will appear on top of any other open windows.
Show Pictures
Choose this option to show graphics on the current page.
Metric System
Choose this option to show rulers and all measurements in centimeters instead of inches.
Default Frame
Choose this option to set the default parameters that will be used any time a new frame is created.
Report Formatter - Buttons
Save
Click on this button to save the report in its current state, overwriting the previous.
Cut
Click on this button to cut the selected frame and keep it in the clipboard.
Copy
Click on this button to copy the selected frame and keep it in the clipboard.
Paste
Click on this button to paste the frame from the clipboard into the selected band.
Horizontal alignment
Click on the button (of the four available) that represents the horizontal alignment of the text within the selected frame. From left to right, the buttons represent Left alignment, Center alignment, Right alignment, and Justified (spread with even spaces throughout the frame).
Vertical alignment
Click on the button (of the four available) that represents the vertical alignment of the text within the selected frame. From left to right, the buttons represent Top alignment, Center alignment, Bottom alignment, and Justified (spread with even spaces throughout the frame).
Frame Border [Left / Right / Top / Bottom]
Click on these buttons to add a borderline on a particular edge of a frame.
Font Color
Click on this button to select a font color for the selected frame.
Fill Color
Click on this button to select a background (fill) color for the selected frame.
Exit
Click on this button to exit the report formatter and discard all changes.
Report Properties - General Tab
Report Title
Enter a name for the report here. This name will be visible on the Report Template list referenced above.
Report Properties - Page Layout
Page Size
Choose the paper page size from the list provided. Alternately you can custom define the height and width of the page in the Height and Width fields by selecting Custom Size in this field.
Landscape
Check this box to shift the printing of this page sideways (90 degrees).
Margins
Enter the distance from the edge of the page where the left, right, top, and bottom margins are.
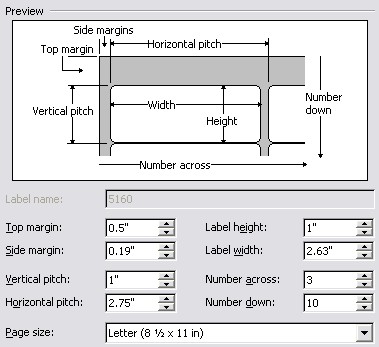
The band defines the borders in which label information will print, it does not define the actual label dimensions. The borders for label information include the area in which the label is actually found, plus any bordering extraneous area on the left and top sides of the label itself. Consider the example shown:
Figure 18-5. Label Dimensions for Avery® 5160 Labels
In this example, the label has a width of 2.63 inches, and a height of 1 inch. But the printable area has a width of 2.75 inches (as noted in the horizontal pitch) and a height of 1 inch. The printable area is what needs to be set up in each band, since it allows for the extra area between labels which allows the next label to print in the proper position. Not doing so will cause labels to creep (shift) slightly to the left of or over the top of the next label, causing it to print improperly.
To create a band, you will need to go into the report formatter as shown above. Once you are in the report formatter, you can right click on the blank page and then click on New Band, then Detail. Alternatively, you can also click on Band on the main menu, then on New, then Detail.
Once a band has been created (a visible rectangle spreading across the screen), you can alter the dimensions to fit your label size by right clicking on the band, then clicking on Band Properties.
Band Properties - General Tab
Print section, if expression evaluates TRUE![]()
Enter an expression in here, if the expression turns out to be true for the data entered, then this band will print. [Note: Unless there is a specific reason to use this, we recommend this field stay blank.]
Memo Field
Enter an expression or text value here which will print immediately following the band.
Mail Merge
Check this box to allow for mail merge information to be placed after the selected band.
Edit Text
Click this button to enter the mail merge information to be printed directly after the selected band. This mail merge information can contain regular text or merged fields from your database.
Band Properties - Position Tab
X
Enter the distance from the edge of the page where the printable area of the label should begin. This field is tied to the left margin in the Report Properties.
Y
This field is not currently used for label generation or printing.
Explicit Page Overflow
These fields are not currently used for label generation or printing.
Width
Enter the distance from the left side of one label to the left side of the next label. If there is only one label per line, then enter the distance between the left and right sides of the label. This will define the horizontal pitch, the horizontal printable area.
| To change between inches and centimeters, click on Options, then Metric System while in the Report Formatter. |
Height
Enter the distance from the top side of one label to the top side of the next label. If there is only one label from the top to the bottom of the page, then enter the distance between the top and bottom sides of the label. This will define the vertical pitch, the vertical printable area.
Keep at the Same Page
These fields are not currently used for label generation or printing.
Frames are used to mark the boundaries of an object placed in a report band. A better explanation would probably be best described as a "box that will contain something." Frames are usable in report bands that you add to a label setup.
To add a frame to a detail band, right click in the frame, then click on New Frame. Or click on Frame on the main menu, then click Create.
Frame Properties - General Tab
Contents
Enter or select the text or field that will make up the contents of this frame. Field names must be preceded by an equal sign (=). You can use the lookup button at the end of the field to select the field you wish to place here.
[Frame Type]
Select the type of information to go in this frame. You may select from Customary frame (text), mail merge (not used), or image from file (for pictures or icons).
Picture![]()
Enter or select the picture format for the frame information. Selecting a field in the Contents field will automatically set the picture format. You can also click on the wizard button at the end of this field to have a wizard step you through the process of choosing a picture format (layout).
Align Horizontal
Select the horizontal alignment for the text that will appear in the frame. Choose from Left, Center, Right, or Both (Justified).
Align Vertical
Select the vertical alignment for the text that will appear in the frame. Choose from Top or Middle.
Color
Click this button to select the color of the border to appear around the text, if any.
Left / Right / Top / Bottom
Check the appropriate box to place a border on the selected side of the frame.
Width
Enter the width of the borders that were selected previously.
Font
Click on this button to select the font to be used for the text in this frame.
Fill Color
Select the color to fill the frame with (background color). This button is active only when the Fill Enable checkbox is checked.
Fill Enable
Check this box to enable the filling of the frame with a background color.
Frame Properties - Position Tab
X
Enter the distance from the page's top margin that the top border of the frame should be.
Y
Enter the distance from the page's left margin that the left border of the frame should be.
Width
Enter the width of the frame here.
Height
Enter the height of the frame here.
Left / Right / Top / Bottom
Enter the distance away from the margins of the frame that the text should be restricted to.
Between the lines of text
Enter the distance that should be kept between the lines of text within a frame.
| Q01. | I don't see my question here. Where else can I get information? |
| A01. | Visit our website's Technical Support section. |
|
|
|
| © 2015 - Intellisoft Solutions, Inc. All rights reserved. | |
| Other Related Links | |
| Business Software | Cellular Software | Pager Software | Business Management Software |