Disbursements |
Previous Top Next |
Menu Navigation
Lists ... Accounts Payable ... Disbursements
Activities ... Accounts Payable ... New Disbursements
About Disbursements
Disbursements are used to record payments made to vendors or individuals for purchases made by your company. These payments can be made for supertrack inventory items, expenses, or previously entered purchase receipts (bills). The disbursements can be recorded from bank accounts, company credit cards, or the currently open cash drawer. You can also have ManageMore print a check for you if the disbursement is made from a bank account that has check printing enabled.
In this Topic
Field by Field Help - Disbursement screen
Related Topics
2.7 How to Use Lists
10.1 Vendors
10.5 Purchase Receipts and Credits
11.1 Supertrack Inventory
13.1 Bank Accounts
13.3 Cash Drawers and Deposits
13.5 Printing Checks
14.1 Chart of Accounts
Field by Field Help - Disbursement screen
Buttons
Save
Click this button or press <Enter> to complete the transaction.
Insert Item
Click this button to insert a new line item into the transaction. This button will be visible when the disbursement is for items or expenses (not bills).
Delete Item
Click this button to delete the currently selected detail item. This button will be visible when the disbursement is for items or expenses (not bills).
Search for Item
Click this button to search supertrack inventory or chart of accounts for an item to be placed on this transaction. This action is dependent upon the Use GL Accounts field.
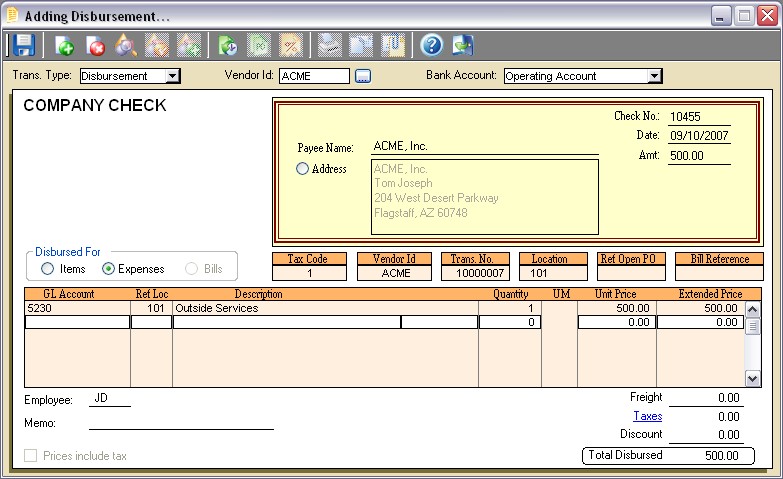
Figure 10-4. Disbursement screen
Create Item
Click on this button to create a new supertrack inventory item. An item can be created on the fly by simply using a template and filling in a SKU item number and cost, or by completing a supertrack inventory item record. Either option will insert the new SKU item into the transaction, when finished.
Item Profile
Click this button to view the selected item's supertrack inventory record. You can then view and/or make changes to the record from the window that comes up. Note that any changes you do make will not immediately affect the line item in the transaction you are currently creating unless you delete and re-add the item.
Fill from Previous
Click this button to have the program fill items from the previous purchase. Click again to fill from the purchase prior to that, and so on. This button requires that vendor ID be filled in first, and that the disbursement is for items or expenses (not bills).
Open POs
Click this button to display a list of open purchase orders that can be used to immediately pay the purchase receipt. This button requires that vendor ID be filled in first, and that the disbursement is for items or expenses (not bills).
Print Receipt
Click this button to reprint a previously completed transaction. This button will be disabled when creating a new transaction. However, an option to print the transaction will be given upon completing the new transaction.
Remove Discounts From Bills
Click this button to remove the discount amount from all bills, regardless of whether you qualify for them or not.
Click this button to reprint a previously completed transaction. This button will be disabled when creating a new transaction. However, an option to print the transaction will be given upon completing the new transaction.
Click this button to e-mail a previously completed transaction. This button will be disabled when creating a new transaction. However, an option to e-mail the transaction will be given upon completing the new transaction.
Attach documents to this record
Click this button to view or attach documents to this record in the Intellifile Explorer.
Header Fields
Trans. Type
Select the transaction type for this disbursement. Choose "Credit" to record cash received/charges reversed.
Vendor ID
Enter the identifier for the vendor to which this transaction relates. This field is not required to complete the transaction, but must be present for certain functions to be used.
Bank Account
Select the bank account from which this disbursement is made. This value may be blank for a cash drawer payout. Cash drawer payouts will be reflected in the cash drawer of the currently logged in employee/location.
To Be Printed
When selected, a check from the selected bank account will be created for printing. The presence of this field is dependent upon the bank account chosen; the bank account must allow printing checks.
Check No./Pmt. Ref No.
Displays the alphanumeric check number/reference that is to be used for this disbursement. This value may contain a default value based on the bank account selected. An "AUTO" check number indicates that the number will be assigned the next available number from the bank account when printing.
Date
Displays the date of disbursement. For non-cash drawer transactions, this date may be changed to record past or future disbursements.
Payee Name
Displays the Company Name (or Print Checks As Name, if entered) of the selected vendor. This value will print on the check.
Amt
Enter the total amount of the disbursement. This value may be calculated by the program if bills are selected or items are entered in the detail section.
Address
Displays the vendor's address. This address can be edited by clicking the radio button provided.
Disbursed for
Choose what this disbursement will be used to pay:
| Items | The disbursement is made for items (tangible, intangible, supplies, expenses, etc.) which have been created in supertrack inventory. This selection will create a paid purchase receipt record upon saving. |
| Expenses | The disbursement is made for general ledger accounts (expenses, assets, etc.) which have been created in the chart of accounts. This selection will create a paid purchase receipt record upon saving. |
| Bills | The disbursement is made for existing purchase receipts. This selection will NOT create a purchase receipt record. |
Tax Code
Displays the tax code to be used to calculate taxes on this transaction. This field will computed based on the Location and/or Vendor chosen, and may be overridden. This field will be available only if the option to allow tax on purchases is selected in Setup Accounts Payable.
Item/GL Account Fields
The following fields will be present only if the items or expenses options are selected.
Trans. No.
Displays the sequential, internally-generated number that is assigned to this transaction. This value cannot be changed.
Location
Displays the location of the transaction. This value cannot be changed.
Ref Open PO
Enter the purchase order number that this purchase receipt should reference. This value may be required, depending upon the option selected in Setup Accounts Payable.
Bill Reference
Enter the vendor's invoice number or reference here. This value will print on the check stub for vendor reference.
SKU Item/GL Account
Enter the identifying code of the item being purchased. A barcode reader may optionally be used to enter this field.
Ref Loc
Enter the location in which this item or GL account should affect. This will only be available on a line item that is considered an expense or on a GL account.
Description
Displays the description of the SKU Item/GL Account chosen.
Quantity
Enter the number of units of the SKU Item/GL Account chosen. The number of decimal places displayed in this field is determined by the quantity precision setting in Setup Inventory.
UM
Displays the unit of measure used when purchasing this item. Quantities ordered will reflect this unit of measure. This field is not applicable to GL accounts.
Unit Price
Enter the cost per unit for this item. The number of decimal places displayed in this field is determined by the cost precision setting in Setup Inventory.
Extended Price
The unit price multiplied by the quantity. Changing this field will recompute the Unit Price.
Bill Fields
The following fields will be present only if the Bills option is selected.
Bill Reference
Displays a listing of the bill reference for each unpaid purchase receipt for this vendor.
Due Date
Displays the payment due date of the purchase receipt.
Terms
Displays the payment terms for the purchase receipt.
PO Number
Displays the purchase order number that the purchase receipt referenced.
Trans. Date
Displays the date of the purchase receipt transaction.
Total Due
Displays the total dollar amount due on this purchase receipt.
Balance
Displays the remaining dollar amount due on this purchase receipt.
Discount
Displays the total discount amount on this purchase receipt. This amount may be computed based on the disbursement date and terms of the bill. Any new discount calculated will post to the original receipt.
Pmt Applied
Enter the amount of payment to apply to this purchase receipt. This amount cannot be greater than the remaining unapplied disbursement amount.
Footer Fields
Employee
Displays the employee ID of the employee creating the transaction. This value cannot be changed
Memo
Enter a reference note about the transaction here. This value will print on the check, but not on the purchase receipt.
| You may want to include a policy or other message on the bottom of every document. A standard policy message which will print on the document can be set for each transaction type in the Form Printing section of Setup Accounts Payable. |
Freight
Enter the amount for freight charges assessed by the vendor. This field will be present only if items or expenses are chosen.
Taxes
Displays the total taxes calculated on the transaction. Click on the link provided to view/edit tax details. This field will be displayed only if the option to allow tax on purchases is selected in Setup Accounts Payable.
Discount
Enter any discount amount here. The value will display as a negative value. This field will be present only if items or expenses are chosen.
Total Disbursed
Displays the total amount to be disbursed.
Disbursements may be voided by selecting an existing disbursement from a list and pressing <delete> or clicking the Delete button. This will automatically select the highlighted receipt for reversal. This will reverse the accounting for the disbursement record. If bills were paid, the program will reinstate the bills for payment. If items or expenses were paid, the program will reverse the purchase receipt created.
The accounting shown is strictly for the disbursement transaction. If disbursing for items or expenses, the program will automatically create a purchase receipt transaction. Thus, the accounting for a purchase receipt would occur first, followed by the accounting shown below.
If disbursing for bills, only the accounting below applies as the purchase receipt accounting has already taken place.
Bank Account Disbursements
Dr |
Cr |
|
Accounts Payable GL Account (From Setup Accounting) |
XXXX |
|
Bank Account GL Account (From Bank Account record) |
XXXX |
Cash Drawer Disbursements
Dr |
Cr |
|
Accounts Payable GL Account (From Setup Accounting) |
XXXX |
|
Undeposited Funds GL Account (From Setup Accounting) |
XXXX |
| Q01. | Can I pay a bill partially? |
| A01. | First, enter the amount to be paid in the disbursement amount field. Then double-click on the bill to be paid. |
| Q02. | How do I print a check? |
| A02. | Make sure the bank account chosen is a checking account, set up to print checks. When entering the disbursement, select the "To Be Printed" check box. Upon saving the disbursement, the check will be ready to be printed. Select Activities ... Banking ... Print Checks to complete the printing process. |
| Q03. | How do I reprint a check? |
| A03. | Recheck the "To be printed" checkbox. Once the disbursement is saved, the program will add this disbursement to the checks to be printed screen. |
| Q04. | I have a negative balance with my vendor and they just sent me a check to satisfy the account. Can I enter a negative disbursement? |
| A04. | Yes, simply select "Credit" for the transaction type. If you have a negative vendor balance, you can simply check off the outstanding Purchase Credits (Apply to Bills mode); or create a new credit by entering items or expenses. |
| Q05. | My vendor balance for a certain vendor is in the negative. Now they sent me a check, but it is not for the whole amount of the negative balance. What do I do to satisfy the check and the balance? |
| A05. | Create a new purchase credit for that vendor and select the Use GL accounts checkbox. Then enter the GL account for the bank account that is being used and enter the amount of the check in the unit price field. This will post this check to your bank account's general ledger account and raise your vendor balance by the proper amount. |
| Q06. | I don't see my question here. Where else can I get information? |
A06. Visit our website's Technical Support section.
|
|
|
| © 2015 - Intellisoft Solutions, Inc. All rights reserved. | |
| Other Related Links | |
| Business Software | Cellular Software | Pager Software | Business Management Software |